Monday 21 April 2014

20 Whacky and Coolest Wedding Invitations


Indians are crazy about weddings, and they definitely want their weddings to stand apart from the rest. But nowadays, Indian weddings are hardly creative. Every couple has a grand hall, multi-cuisine menu and designer dresses. So how can you make your wedding stand apart from the rest? It is simple; start by printing some unique wedding invitation cards! Here are some whacky wedding invites that will simply blow your mind.
Recommended Read:
Bollywood beauties who Fantasy Married Men
7 Things Men Should Stop Doing after Becoming Husbands
Bollywood Celebs Who Flaunt their Love Affair with Tattoos
Open a bottle of happiness

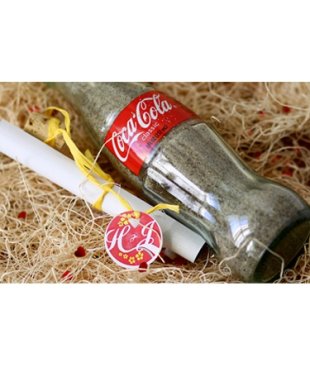
Grab soft drink bottles from the kabadiwala, clean it well, and fill it with elements, like coloured sand, a little glitter and a hint of some breezy fragrance. Send it to your friends and relatives with a small scroll giving information about your wedding venue. You can also tie some ribbon around the bottle to make it into a cute keepsake for your guests. This is a great DIY (do it yourself) card for those who love to recycle!

Image courtesy: Anne Ruthmann photography
Kuch meetha ho jaye!

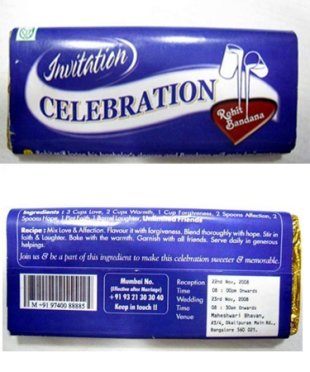
Chocolate is something, which everyone associates with happiness; be it your first birthday or Diwali celebrations. So why not print your wedding invite on one of the quintessential elements of your life? You can also include creative ingredients (love, care and happiness) and a whacky MRP (your guests' blessings) on the cover.

Image courtesy: www.mr-funny.com
Comic Strip

Star Wars' lovers, fans of zombies, and vampire freaks will love this invite. You can create a gothic wedding card or create illustrations using your favourite comic character. You can also create a small comic strip narrating all the details about your wedding.

Image courtesy: www.webdesignerdepot.com
Folksy cards

Do you belong to a region, which is known for its rich culture? If yes, then you should try to showcase that through your wedding card. This card shows the art of puppetry, which makes it quirky and cool.

Image courtesy: www.kshiraj.com
Photo roll

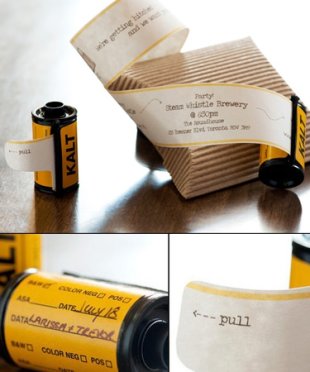
Send your guests a photo roll, with instructions printed on a piece of paper. As they pull the roll out, they would be able to read all about your good news and the wedding details.

Image courtesy: ambient studios (modern wedding photography)
Tell me your love story

Do you want your loved ones to know how you met your spouse? Your first date, the time you fell in love and how he proposed to you? Well, simply print a card detailing the cute anecdotes, your little fights, and the 'Yes, I will marry you' moment!'

Image courtesy: www.trouinspirasie.co.za
Inflate Happiness

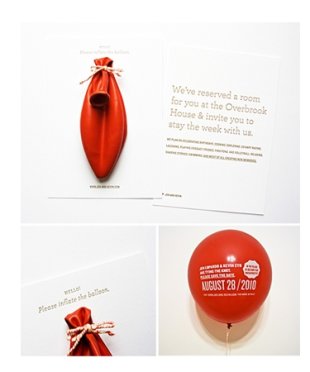
Print your wedding invite on a balloon and send it in a fancy envelope to your guests. When they open it, they will be puzzled to find a balloon. But when they do inflate it, they will get one of the best surprises of their lives.

Image courtesy: www.julietmarriesromeo.com
Mad about Sci-Fi

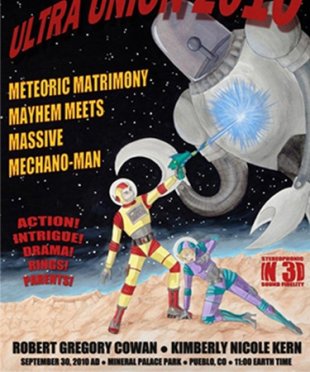
If you and your husband love science fiction, then you can create a small story line and design your card accordingly. Incorporate your wedding details seamlessly with the plot.

Image courtesy: www.dzineblog.com
Tray of joy

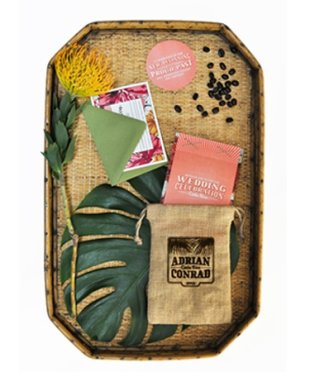
A bamboo tray filled with goodies and exotic flowers with the wedding invite kept in a small jute bag is indeed an ec-friendly idea. You can also decide on a theme and buy your small elements and flowers accordingly.

Image courtesy: ohsobeautifulpaper.com
Gizmo card

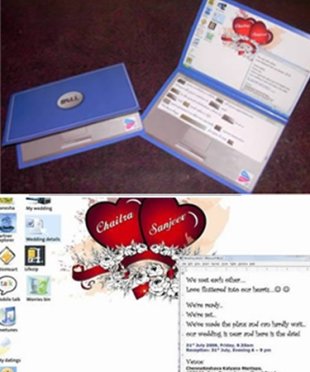
Do you and your spouse love gadgets? Then this laptop inspired invite is simply perfect for you. Jazz it up with some tongue-in-cheek humour and witty lines.

Image courtesy: www.oddee.com
The Great Indian Circus

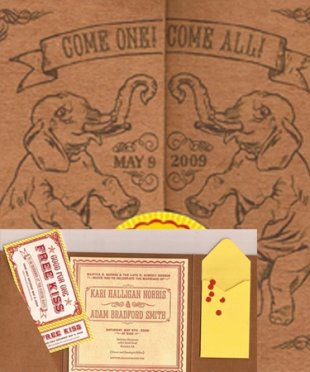
Indian weddings are no less than a circus with their bright lights, grandeur, and over the top decoration. So, send invites in complete circus ishtyle with tickets, show highlights (i.e. the wedding), date, and venue.

Image courtesy: www.oncewed.com
The edible card

Instead of opting for boring handmade paper, you can print your wedding invites on something as innovative as eggs (wooden of course!). If you are not excited about eggs, then you can opt for other things. Let your imagination soar!

Image courtesy: www.etsy.com
Bird house

This card not only looks cute, but will also make a great keepsake for your guests. Instead of making a bird house, you can create your own little 'home sweet home', along with a nameplate announcing you as Mr. and Mrs.

Image courtesy: www.easterndresses.wordpress.com
Zoozoo love

Indians love zoozoo; so why not take this love to another level with a zoozoo themed wedding invite? This card is perfect to express your cute wedding story.

Image courtesy: www.oddee.com.
Movie poster wedding invite

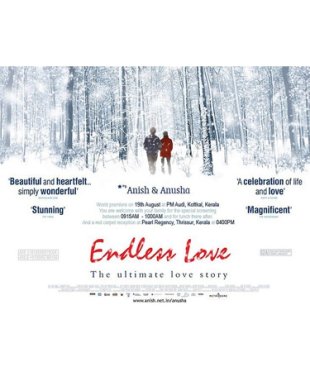
Bollywood themed wedding invites are a passé; instead get your wedding card designed like a movie poster, with 'expert reviews' from dadima and dadaji, a brief glimpse to your love story and an awesome title.

A ticket to your wedding

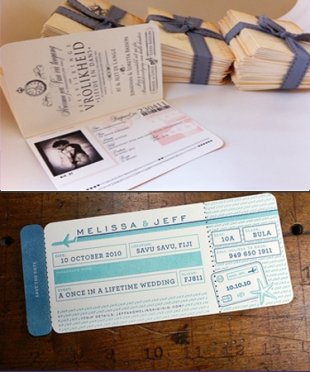
Get your wedding card printed on the template of an airline ticket mentioning the venue, the date, time, food and other details. To make it look authentic, give the 'airline' a name like 'Love Express' or something really quirky. You can send it across in a formal looking envelope. Card in the form of a passport is also another innovative idea.

Images courtesy: www.bespoke-bride.com and www.loveolio.com
Traveller card

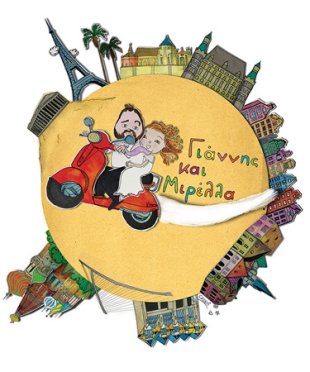
Showcase all the romantic spots in the world and your good news through this amazing pictorial wedding invite.

Fun photo invite

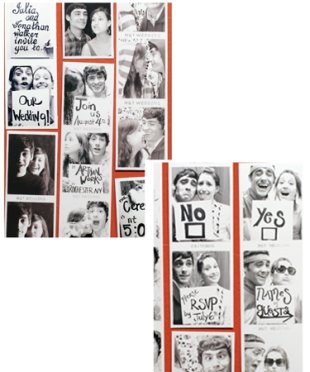
Pictures speak a thousand words and this card will definitely convey a lot more than that. All you have to do is just make a collage of your funny and weird photographs, which will tell your guests all about your courtship and romantic chemistry.

Image courtesy: www.blisstree.com
Rotate the wheel

One of the most interesting ways to create a wedding invite is to print it on chipboard invitation wheel. Your guests will have loads of fun rotating the wheel to get the relevant information.

A boxful of love

If you want to give your guests a pleasant surprise, you can get your wedding invite printed on the inside of a box and fill it with goodies. It could be dry fruits, sweets, chocolates, confetti, a showpiece or anything else you can think of. They would definitely have a smile on their face when they open the box.

So don your creative caps and send some cool and 'out of the box' invites to all your guests.

Wednesday 5 March 2014

Tiffany’s Themed Indian Engagement Session by JPG Photography

I can’t believe we’re already halfway through with Engagement session week. Moving right along our next engagement session is a combination between a traditional photo shoot and an intimate party captured by JPG Photography.
Trey and Bansi’s celebrated their engagement with 60 of their closest friends at The Ritz Carlton in Philadelphia. The party was based on the Tiffany & Co theme which was carried out through their invitations and the colors of the candy in their Candy Buffet.
1 indian engagement party menu and escort cards
4 Indian Engagment Party Dessert Table Decor Pumpkin
2 Indian Engagement Party tiffany themed round halo ring
3 Indian Engagement Shoot Portrait
As an added bonus the day of the party was also Bansi’s birthday as well and Trey surprised her with a Tiffany’s themed birthday cake!
7 indian engagement party tiffany's themed cake
8 indian engagement party tiffany's themed birthday cake
9 indian engagement party tiffany blue cake
I love the staircase shots that JPG Photography took of the couple. The composition is amazing and is truly a work of art not to mention the talent involved with manipulating the light.
5 indian esession staircase round shot portrait
10 Indian Engagement Party Family Portrait
6 indian esession staircase portrait
Thank you so much to Bansi and JPG Photography for submitting this engagement session!
See more from their engagement celebration over at the photo gallery!
Stay tuned we have another engagement session coming up next

Underwater Engagement Session by Z Molu Photography

You may remember our next photographer, Z Molu Photography, from our last engagement session week where he shared an unbelievably beautiful prague engagement session, and now he’s back debuting his latest work of art with Punam and Sunny’s esession.
Punam and Sunny are two people after my own heart with their love of dessert-they even have a prop that says Life is too Short, Eat Dessert More. Could there be a more true statement? Between their sweet picnic shots, sultry at home shots and the aquatic dream shots Z Molu Photography showed us an eclectic array of scenes from Punam and Sunny’s special shoot!
1 indian beach engagement session ,Underwater Engagement Session
2 indian dessert props esession Underwater Engagement Session
3 indian dessert outdoor picnic engagemetn session
7 indian pillow prop engagement session
4 indian aerial engagement shoot couch red dress
8 indian staircase engagement shoot
I can’t get over these pool images that were shot, not to mention how gorgeous Punam’s dress was! The underwater clarity is amazing and the blue and green water makes an amazing backdrop!
6 indian hugging poolside shoot
11 indian feet in pool engagement shoot
10 indian esession pool
9indian underwater engagement shoot portrait
9 indian underwater hand holding esession
That wraps up engagement week! Thank you to Z Molu Photography for another perfect shoot and congratulations to the happy couple!
To see all of the images from today’s shoot make sure to visit the photo gallery!

Tuesday 18 February 2014

10 Budget Decorating Tips

As ya'll know, I've been working on our living room lately. Today, I thought I would show you some of the changes I've made and share some of my budget decorating tips I use when trying to max out my little budget.

I'm the first to admit that I make a lot of decorating mistakes, but one thing I am good at is stretching a dollar.
I will make that dollar do the SPLITS.


The last time I blogged about this room was in May of last year (in a very embarrassing post), and quite a few changes have taken place since then. But, just for fun, let's go back to the very beginning and remember what the living room looked like the day we first moved in. 


It was basically a blank canvas. It's changed about a million times since then, and I'm sure it will change again soon. 
Anyone else suffer from compulsive-pillow-swapping-syndrome?

Anyways, here's where we are today. 
The couches, ottoman, and TV are pretty much the only store bought items in this entire room. The rest I've gathered from thrift stores through the past few years.
As I mentioned in my teaser last week, I made a few pillows out of some colorful fabric and spray painted a thrift store tray gold.
And then I just spent a lot of time making stuff and collecting things that I loved.
A bit of Jesse's music gear is in just about every room in this house (he's a man who can play a mean keyboard), but I've decided that his guitars make for great decorating accessories. He doesn't understand this at all, but enjoys the fact that I keep photographing his beloved guitar.
This one's for you, boo.
Some old thrift store end tables were painted a soft white (furniture paint tips found here) and I found a really great blue and white ginger jar at the thrift store for around $7. 
I feel like normal people probably wouldn't get excited over that find, but TRUST, there was excitement in my little frugal heart. It didn't know what to do with itself.
And just to be authentic, no, there are not flowers in my house on a daily basis. Jesse always knows a blog post is about to happen when I bring $3 flowers home from the grocery store. 
It just makes for a prettier picture. :)

Sidenote though: I got that little clear square vase at the Dollar Tree for a buck. I've seen them for $5-10 everywhere else. 
Dollar s-t-r-e-t-c-h-e-d.
And now for my favorite new addition.
I decided to create a gallery wall around the TV.

I think I spent a total of about $30 on the gallery wall, which feels like a major accomplishment since one new frame usually costs $20.
Also, yes, Kevin is back. 
I don't wanna talk about it. 
But, I will. Next week. For now, let's just give him a friendly wave and go about our business.
Moving on.
While mixing metallics used to drive me crazy, it's quickly become something I love. For the gallery wall, I used silver and gold frames. I found a few modern silver frames on clearance at Target, and sourced the rest of the frames from thrift stores. 
Most of the art was handmade or something thrifty.
Here's the gallery wall breakdown.
I made a few abstract pieces of my own using several blue and green paints combined with the amazing gold leaf paint I used here.
I've found that even the most simplistic art looks great when matted and framed.
I also made a large abstract piece of art that was super easy to do, but totally ended up being a favorite.
I framed that piece in a large $2 thrift store frame and just spray painted the mat white. It was originally a muddy orange color, but it was an easy fix.
And see that little gold leaf anchor?
 I made that using the same tips I shared in my gold leaf art tutorial.
I made a gold leaf ampersand, too.
It fits in well with a few thrift store finds...a botanical print (re-framed in a modern frame), a metallic seashell print (kept in the original frame) and an ornate mirror.

And to further my obsession for all things cat, I added a giant jaguar print.

I found it for $4 a couple weeks ago at the thrift store (which I sneak peeked on Instagram) and nearly fainted when I saw it.
And you think I kid. You can also see my little ginger jar and seashell prints that I scored nearby.
It's weird, but I make no apologies for my feline obsession.
To know Cheese and Tootie is to be obsessed with them.
Oh, and those horses? 

 Got 'em from a book. A 99 cent thrift store book.
It was titled 'Careers for Horse Lovers' and provided me with 7 great horse photos and 700 questions.
*One-manhand-per-post quota fulfilled.
As for the mirrors on the gallery wall, those all came from the thrift store, too. I actually found all of these at once, and couldn't pass them up. I gave them all a quick coat of this gold spray paint (affiliate link) before adding them to the gallery wall, as they were originally a little too antique looking.
And that, friends, is the living room. 
So, now that you've seen the latest living room updates, completed for a total of about $100, let's talk about a few ways I stretch my dollars.

Here are my top 10 budget decorating ideas.
#1. Mix and Match.
The key is using a little old and a little new. Find a few great new pieces and fill in the gaps with things you collect over time. In my experience, most of those gaps can be filled with thrift store finds....if you're willing to take the effort to look.
#2. Know where to look.
Over the years, I've scoped out nearly every thrift store in town. Most of them are not great. Several of them are amazing. I check out the amazing ones frequently, as it's a first come first serve situation. My best thrift store tips can be found here. I also frequently search for items on Craigslist (tips here) and spend a few weekends during the summer going to local garage sales and estate sales.
#3. Don't be deterred by the current color of an item.
Once you can look past the current color of an item, your whole little decorating world will change. The possibilities are endless once you understand that it's the shape that matters. You can always Rub n Buff, paint, stain, or spray paint. (Here are some great spray paint tips to get you started.)
#4. Make your own pillows.
I used to waste a lot of money buying pillows. That ended the day I discovered this.
#5. Paint furniture.
This sums up my life. Basically, just go read this.
#6. Update hardware on furniture. 
Even if you paint thrift store furniture, the hardware is usually really outdated. A really easy way to update it is to either replace the hardware all together, or to spray paint it a better color. Either way it makes a huge difference. 
#7. Make your own art.
I don't care how unartistic you think you are. I promise that you can make abstract art. Plus, if you put it in a great frame, it will look like a million bucks. I know this because about 75% of my art is really terrible and if I put it in a matted frame, Jesse usually thinks I bought it. Fact. :)
#8. Pass on the junk, buy the classics.
I've fallen into hoarder-territory several times throughout the years while thrifting. Over time, I've learned that I don't need to purchase every little item I like just because it's a dollar. I've learned the importance of waiting for those really great finds. 
My trick is to ask myself if I will like this 10 years from now. If I have to think about the answer, I need to set it down.
SET. IT. DOWN.
#9. Don't be afraid to fail.
The best part of budget decorating is that it allows you a lot of room for messing up. If you've only spent $50 on that dresser, it's not the end of the world if you ruin it because you got a wild hair to paint it pink. 
#10. Be unique.
This is my favorite tip.
 Be unique. 
In my own little journey, I've found that through limitations comes creativity. When you can't just run to (insert whatever store floats your boat here) and plop down thousands of dollars for new stuff, you're forced to think outside of the box. The minute I stopped being embarrassed about that and actually embraced the fact that I do things differently, my world blossomed. 
And I know yours will, too. 
That's all for today sweet friends. 
Thank you for sharing in my little journey. :)